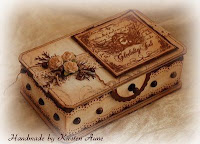
Tutorial - Place Card for Confirmation
I made Place Cards for my niece Camilla's Confirmation last weekend! This small "purse" gives room for a little chocolate for the guest. ;)
I've got many questions about how I made this Place Cards, so I desided to make this Tutorial. :)
Cut out 2 pieces of Spellbinders Shapes Tag Fancy.
You need a piece of cardstock - 9 x 12 cm.
Scor at 3 and 6 cm
Turn around, and scor at 3 and 9 cm.
Cut as shown below.
Glue along the short sides as shown below.
Cut off the corners, add glue and mount the die-cuts panels.
Cut out a piece og patterned paper, size 5.8 x 2.9 cm
I've used the Mini Hearts Edge Punch from Martha Stewart to make the Handle.
Cut out a piece of cardstock, size 3 x 13 cm.
Cut out a piece of cardstock, size 3 x 13 cm.
Glue and add the Handle to the little "purse", and decorate the Place Card as you wish. :)
Materials:
Tools: ScorPal
Patterned Paper: Maja Design - Syrenen Blommar.
Dies and punch: Spellbinders - Shape Tags Fancy, Martha Stewart - Mini hearts edge punch.
Embellishments: Bånd, Kort&Godt - Pearls, Papirdesign - Flowers, Charms.
Thank you so much for visiting my blog, and for taking the time to leave me a comment.
♥ I appreciate that very much! ♥
I wish you all a wonderful weekend! Take care!
Hugs, Kirsten


35 kommentarer:
what an interesting idea thank you for sharing it with us
Hugs Kate x
Nydelige bordkort :o)
Bea
Hi these are wonderful a d could be used for so many occasions. Using the fancy tags really makes it so chic. Thankyou for the tutorial. Kitty :D
Enhorabuena, precioso trabajo, eres absolutamente creativa y elegante, me encanta este tutorial y te lo agradezco mucho.
Besitos, feliz fin de semana.
Oh girl these are just gorgeous !!!
Thanks so much hon
such a lovely idea i love them .....K x
Hello Kirsten, OMG, this is beautiful and what a great idea. Thanks for sharing.
Hugs, Yvon
Hi Kirsten! :)
Oh, this is just marvelous idea and tutorial :) And so beautiful too - of course :)
Thank you for the tutorial and wishing you a wonderful weekend as well :)
Hugs,
Karita
hai Kirsten what a lovely idea thanks for sharing I love the details off this little chocolate box
greetz Cora
Hejsan. Vilken jättesöt idé. Tack för inspirationen :)
Kram Anna
annajanermark@bloggspot.com
What an original idea! And I bet the guests will love the chocolate inside LOL
Greetz
** Evi **
Nydelige bordkort!!
This is wonderful, thanks for the workshop.
annette
This is so beautifl Kristen.
Hugs Riet.xx
Hei!
Nydlig bordkort du har laget. Helt fantastiske! :) Men hvordan har du fått på navnet? :) Mvh Henrikke
These are stunning and will make a great talking topic on the tables.
Kim xXx
Dette må da være verdens søteste bordkort! Så nydelige småvesker, tenker de gjør/gjorde lykke! ha en riktig fin 17 mai! klem - Anne Lise
Super idé, Kirsten, så fine!
Wow, så snyggt och elegant!
Ha en trevlig vår!
Klem, shirley
oh wow these are just stunning love the colors detail just amazing thanks for sharing hugs cheryl xxxxx
Wow, så flotte de ble!!! Herlig!
God søndag fra solfylte Tromsø!
Klem, Hege
Åååå så stilig.
For en super idè.
Dette må jeg prøve.
Takk for at du deler oppskriften :)
Ann Elin ♪♫♪
Wow, what a wonderful idea! This looks great! Love it!
Disse var lekre....
De er så flotte de tags'ene.
Klem fra kaia
Absolutely fabulous!!! Thank you for sharing.
Hugs Yolanda
Heisann :) Syntes denne veska var super spennende som jeg kunne tenke meg til konfimasjonen til min eldste, Synne :) (om 2 år hehe, tidlig planlegging er gøy :)
Så er jeg helt ny i kort scrappingverden....., det jeg lurer på er hva det brette du lager bretter på ark på heter? Kan se genialt ut :)
Lykke til videre, du gjør noen FANTASTISKE JOBBER
Hilsen fra Ellen
Hi,
these are wonderful, thanks for sharing!
Have a nice day,
Karin
Hello my dear friend. Thank you for this fantastic tutorial. They are so adorable. I hope you're well.
Hugs xo Jackie
Hello Kirsten, this is very beautiful.
Gr. Ineke
wow..this is awesome, they are gorgeous.
Hi Kirsten
What a lovely bag, so cute.
My name is Claudia and I live in Switzerland.
Thanks also for the tutorial.
Greetings, Claudia
What a great idea! These are absolutely gorgeous!
Hugs,
Sabine
For en flott idè! Og så nydelige! :)
Så nydelige disse var, Kirsten! Utrolig lekre.
Kjempefine :)
Klem
Legg inn en kommentar